


However, over time, these tiles can become worn, damaged, or dirty, requiring restoration and regular maintenance to preserve their beauty. In this article, we will explore the steps to clean mosaic floor tiles, restore and maintain them, ensuring they remain a stunning focal point of your space.
Tiles with a Victorian design appeared for the first time in the 1800s and are available in various forms, dimensions, and hues. Although several enterprises produced encaustic tiles, The Minton, Hollins & Co. was one of the industry's pioneering and most significant businesses. Even today, people frequently call these tiles "Minton tiles," after the company that made them.
Middle-class homes began increasingly incorporating encaustic and geometric tile floors beginning in the 1880s. This trend continued far into the 1920s.
How to Clean Victorian Tiles
Understanding how to clean a Victorian hallway tile floor that has seen better days is an important aspect of preserving historic floor tiles. Improper cleaning might actually cause damage to your hallway floor.
If you are interested in keeping your Victorian floor tiles looking great for many years to come, you need to learn how to clean them properly.
Patience is necessary for effectively cleaning of tiles as it could take you quite a few hours.
Make sure the area is ready to be cleaned. Take away any pieces of freestanding furniture. To remove dried soil and grit from the tiling, use a dry brush or a vacuum cleaner and work in a dry environment.
Assess the Condition: Before starting any restoration work, carefully assess the condition of the tiles. Look for cracks, chips, loose tiles, or areas with missing tiles. Take note of any stains, dirt, or grime that may have accumulated over the years. This assessment will help you determine the extent of the restoration required.
Cleaning the tiles
Begin the restoration process by thoroughly cleaning the tiles. Sweep or vacuum the floor to remove loose dirt and debris. Use a mild detergent, baking soda or a specially formulated cleaner and warm water to mop the floor. Avoid using abrasive cleaners or harsh chemicals that can damage the tiles. For stubborn stains, use a soft-bristle brush and gently scrub the affected area. Rinse the floor with clean water and allow it to dry completely before proceeding.
If you are not successful at removing waxes and coatings without using chemicals, make use of a sealer remover to eliminate them and to remove water-based acrylic sealers. LTP Solvex and Lithofin Waxoff are of very high quality. Both are effective at removing the vast majority of sealers and wax coats.
They are also effective at removing paint, which is beneficial given that floors frequently have paint splatters, but less beneficial given that they are effective at removing paint off skirting boards.
- If you are going to use these goods, you should safeguard your skirting with 2 inch low-tack masking tape.
- Instead of applying it using a paintbrush made of synthetic hair, you should use a paintbrush made of natural hair to apply the sealer remover.
- If you cannot find a paintbrush made of natural hair, a low-priced dust brush made of natural hair will do the job just as well.
- Before you start cleaning, you should make sure that your method is effective and that you are comfortable with the procedure by testing it on a tiny area first.
- After applying the product to the floor and allowing it to sit there for ten to twenty minutes, the sealer should have become more malleable.
- Because the chemical may seep into the tile surface, you need to keep the surface wet as you work, so divide the area into manageable parts.
- Scrub the area using a cleaning pad
- Wear gloves to protect your hands and an apron to protect your clothese.
- Continue until all of the remains of the old sealer have been removed, even if you see the sealer peeling away.
It is possible that you may need to carry out the procedure more than once if your tiles are worn and have a dish in the surface, have old coatings that are trapped in the grout lines or have chips.These products contain powerful chemicals, and because they have the ability to remove paint, you should exercise caution when using them close to skirting boards and the edges of any standing furniture.
- Remove the thick residues with a plastic blade and place them in a black bin bag
- Use some clean, warm water and a sponge, and then dry with a towel or cloth after removing any residue that may still be present.
- After that, give it a few washes with a weak solution of an alkaline cleaner such as LTP Grimex, which should be diluted 1 to 10 with clean water.
Repairing
Once the tiles are clean and dry, it's time to repair any damaged or missing ones. For small chips or cracks, you can use epoxy or adhesive to fill in the gaps. Carefully apply the adhesive and smooth it out to match the level of the surrounding area. If a tile is completely broken or missing, try to find a replacement that matches the original design. Specialty suppliers or salvage yards may have vintage Victorian tiles available. Ensure the new one fits snugly into place and secure it with adhesive.
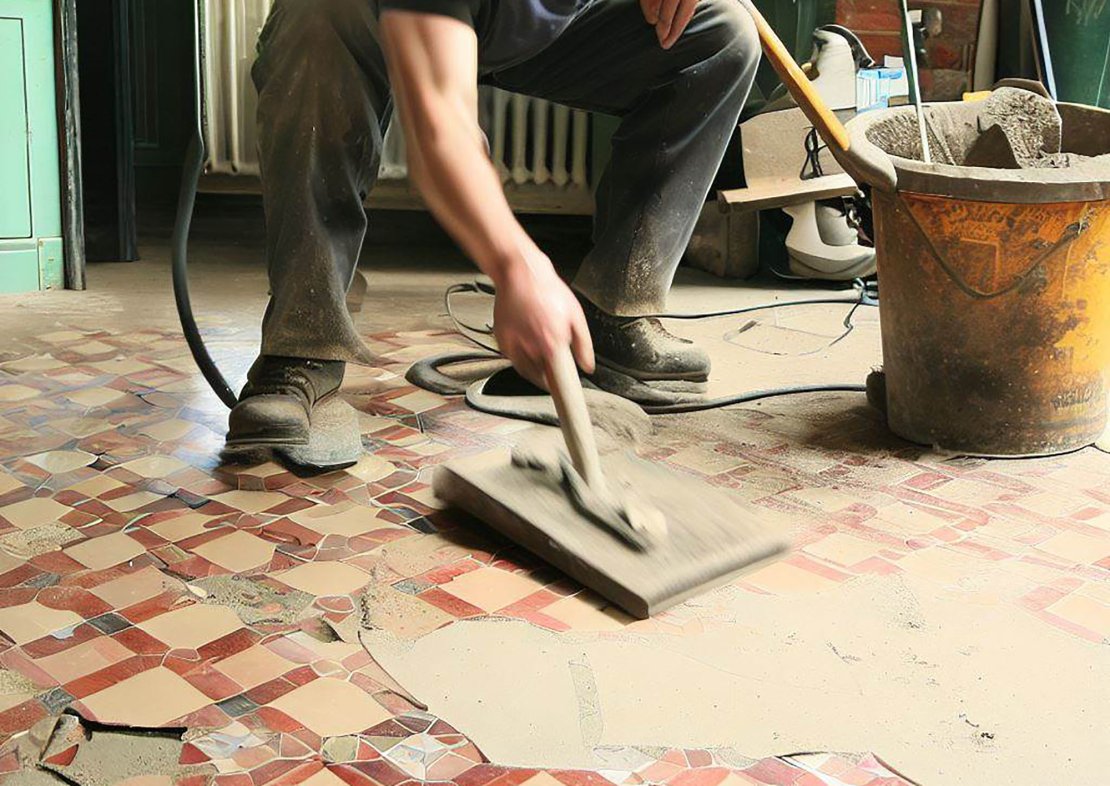
Replacing Grout
Over time, the grout can become discoloured or deteriorate. To restore the appearance of the floor, consider replacing the grout. Use a grout saw to remove the old grout carefully, taking care not to damage the surrounding tiles. Once the old grout is removed, clean the gaps thoroughly and allow them to dry. Mix a fresh batch of grout according to the manufacturer's instructions and apply it evenly in the grout gaps using a grout float. Wipe away any excess grout with a damp sponge and allow it to cure for the recommended time.
Maintenance Tips:
- Regular Cleaning: To maintain the beauty of Victorian floors, establish a regular cleaning routine. Sweep or vacuum the floor regularly to remove dirt and debris that can scratch the tiles. Mop the floor with a mild detergent or cleaner and warm water to keep it looking fresh. Avoid using abrasive materials that can damage the tiles.
- Protecting the Tiles: Prevent damage to Victorian floor tiles by placing mats or rugs at entrances to catch dirt and moisture from shoes. Use felt or rubber pads on the bottom of furniture to prevent scratching or indentation. Avoid dragging heavy objects across the tiles, as this can cause cracks or chips.
- Stain Prevention: To prevent stains, clean up spills immediately. Victorian tiles are porous and can absorb liquids, leading to permanent stains. Use a blotting motion with a clean cloth or paper towel to absorb the spilled substance. Avoid using harsh chemicals or abrasive cleaners, as they can discolor or damage the tiles.
- Periodic Sealing: Periodically sealing the tiles can help protect them from stains and wear. Check the manufacturer's recommendations for suitable sealers for your specific tiles. Apply the sealer evenly according to the instructions, ensuring complete coverage. Allow the sealer to dry thoroughly before walking on the floor.
These same methods can also be used to clean and maintain garden mosaic tiles.

Posted by Alvaro Gandara - Apr 29, 2025 - 16:00
beautiful looking tiles, a little touch of vintage making it more appealing