


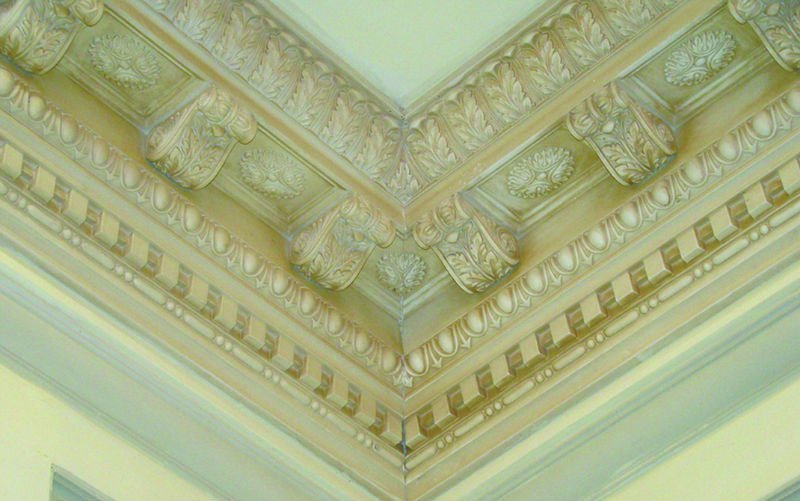
Plaster coving is best used on plastered surfaces i.e. walls and ceilings. Wooden Victorian coving is best used outdoors and is commonly used on porches and verandahs. It is also used to give a professional finish around the tops of kitchen cupboards and for making decorative curtain pelmets. Many people choose to use wooden coving on walls and ceilings instead of plaster because they perceive plaster coving as being heavy and messy and the fitting of plaster coving to a difficult, complicated task needing specialist skills. The issue with using wooden coving on a plastered wall is that the two materials will expand and contract at different rates therefore wooden coving might easily cause cracking.
How do you fit plaster coving?
Fitting plaster coving is not difficult, especially if you have a friend or a suitable tradesman to help you. This would need to be somebody tall enough to reach the ceiling from your platform and strong enough to hold up a piece of coving on their own whilst you screw it in place.
You will need to work from a platform rather than simply from a stepladder as you will be spending a fair amount of time holding up your coving whilst the adhesive dries and you insert screws at suitable intervals, and any platform you use will need to support both you and your helper at the same time so needs to be very strong and stable. We would recommend a mini scaffolding tower. Victorian houses tend to have high ceilings so you might well need to have a platform that can go up to 6ft high.
To start fitting the coving cut off a small length to use as a template and mark the top and bottom edges on the walls and ceiling all around the room to act as a guide for the position of the coving.
Remove any wallpaper or loose paint and plaster from the area where the coving is to be fixed in place. Ideally, the room would have been replastered if there are any crumbly and uneven walls. Make criss-cross scratches between the guides to provide a key for the plaster coving adhesive.
Use a mitre box to help cut an accurate mitre at the end of the first piece of coving – this will create your 45-degree angles that you need to make the coving pieces join up in the corners of your room. Take care to place the cornice the right way around and always double-check that you are cutting the angle in the correct direction. It is always best to cut your lengths from a stable platform set at a suitable height such as a workbench. You may need to ask somebody to help you hold the coving in place whilst you cut; alternatively, use g clamps to assist if working on your own.
If your wall length is less than that of a piece of the cornice, you will need to accurately measure the wall and cut the other end with an appropriate mitre as well. This will normally be the reverse angle if you are fitting to an internal corner (imagine the inside of a box) rather than an external angle (imagine the outside of a box). When making the cuts, use a standard wood saw that is very sharp with small teeth and try to use an even back and forward movement to end up with a neat edge. Take your time with the mitres as the neater you do these, the less work you will have later on with filling the rough edges and corners.
Spread an even layer of adhesive over the top and bottom of the back of the coving - the areas that will be in contact with the walls and ceiling. Press the coving into place and line up the bottom edge with the pencil guideline you drew earlier. Press gently along the whole length so that the adhesive sticks evenly.
Long lengths of coving may sag or fall off before the adhesive has set so you would need to support the bottom edge with one or two galvanised nails. You can remove these and fill the holes when the adhesive has dried. Alternatively, use long pieces of wood to support the coving which needs to be longer than your ceiling height. Placing one end underneath the coving and move the coving along the floor until it is jammed under the coving, fully supporting it. Make sure you don’t push it into the coving too hard and chip or damage it.
It is wise to use screws as well as adhesive to fully and securely fix the coving in place. Countersink the screws first by twisting a Stanley knife into the face.
Use a paint scraper to remove any adhesive that oozes out from the top and bottom edges and to smooth the joint line. Fill any gaps with more adhesive or plaster coving filler and then use a wet paintbrush to give a smooth finish.
Continuing around the room, you can simply butt one piece up to the previous one with a straight join.
If you have any external corners in the room, you will need to cut the two ends which join here with mitres in the opposite direction from those you have cut previously. This often causes problems since, not only have you got to remember to cut the angle the right way, but also the point to which you measure is different. The best way to remember and get it right is to always measure for the bottom edge of the cornice on external angles and the top edge for internal angles.
Try to make as few joints on the walls as possible. It's worth buying an extra full-length piece of cornice rather than use up two shorter sections - the result will be neater. Try to avoid joins in focal points of the room for example where you first enter the room or where your eyes rest when sitting on the sofa.
Most plaster type cornice is fairly fragile so take care when lifting it so that it doesn't snap, and if you drop it, you will most likely damage the ends and these will need to be sawn off.
After fitting your coving, you may need to fill the joins to make them less visible. Your coving can then be painted either in a plain colour, or possibly you could create a focal point by painting the coving and adding touches of gold highlights, as your taste dictates.

How do you fit wooden coving?
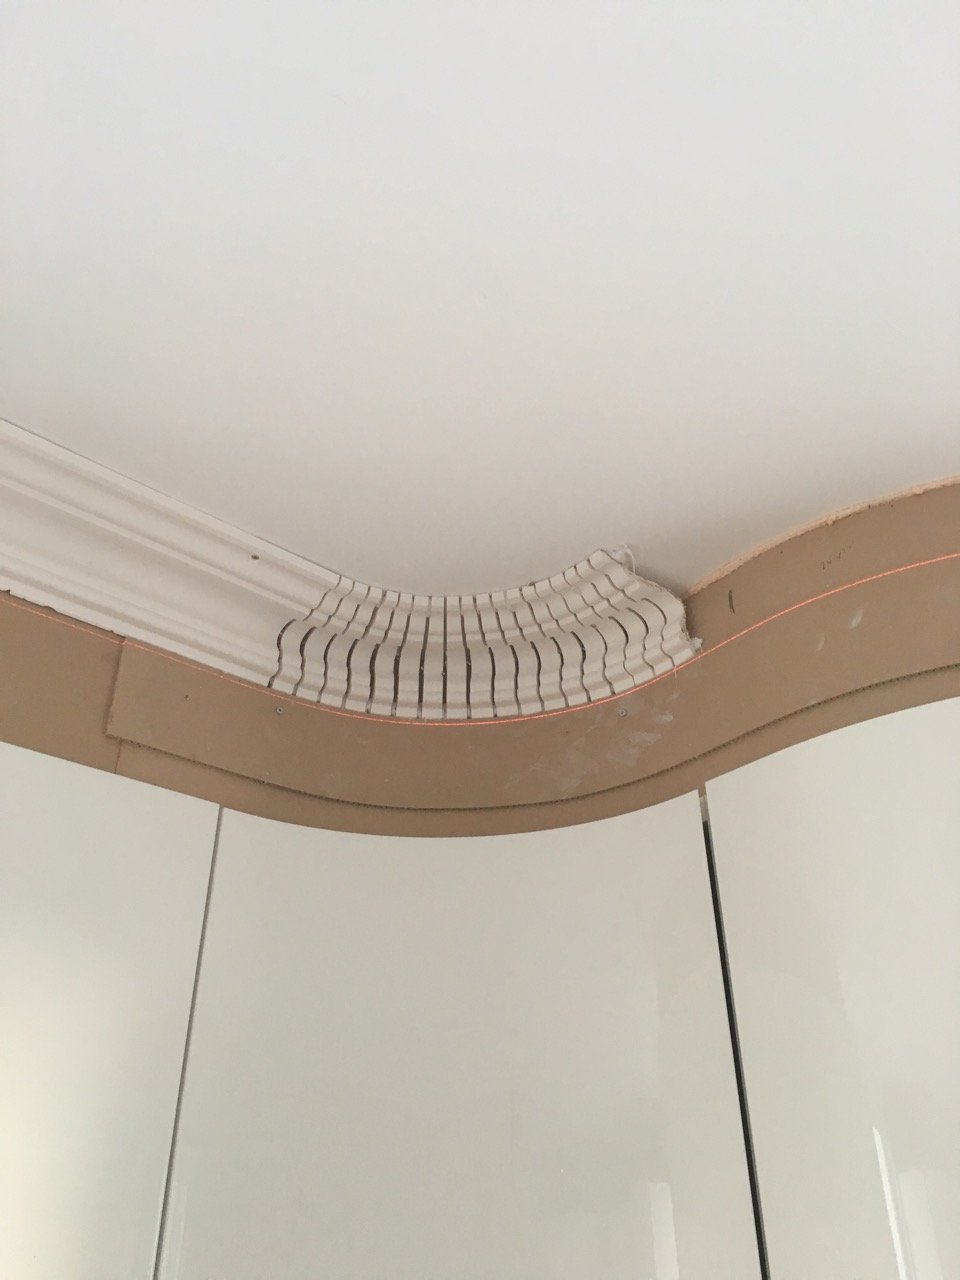
The same techniques above can be applied to help you make the most out of your wooden Victorian coving. The advantages of using wooden coving is that it is lighter to use, not messy and can be simply screwed in place. Wooden coving is easier to use if you have a very complicated job on your hands such as a curved wall as perfectly illustrated in the picture below. If you wish to fit coving around a curve, you'll need to chop the coving into narrow "slices" and then arrange them around the curve. The gaps in between the slices can then be filled and painted giving a perfect finish. You should expect some shrinkage over time as the wood ages and seasons so cracks may appear in the paint. This can simply be refilled and painted over.
The Victorian Emporium sell a large range of plaster coving and Victorian wooden coving and can provide help with fitting coving. You can also read our ultimate guide to period property renovation here.
Be the first to add a comment...