


Or you may decide like many of our customers that your preferred course of action is to create an extension that merges seamlessly into the style of the original house. If you are taking the second approach, you and your architect will be looking to replicate design features that appear elsewhere in your house such as matching bricks and roof tiles, half timbering, chimney styles, moulding styles , windows etc to try to fool people into believing that the extension is part of the original house. This is a way of ensuring that your Victorian house has maximum appeal when you come to sell – statement extensions can be offputting to some buyers who are specifically after period style properties.
What period are bay windows?
In the late Victorian era, Building Regulations were relaxed, so that ground floor windows no longer had to be flush with the exterior wall of the property which led to many properties being built with protruding bay windows. They were popular because they created a light and airy sitting area and with the availability during the era of larger pieces of glass rather than small panes, larger windows became accessible to the masses. The bay windows usually had their own roof made of tiles or lead.
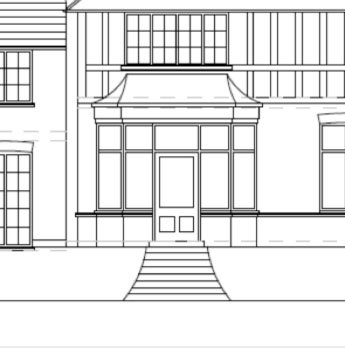
Canted bay windows with a straight front and angled sides became a particularly fashionable and popular characteristic of middle-class Victorian houses and villas. These original bay windows are usually found in reception rooms most commonly at the front of the house.
Why include a Victorian bay window in my extension?
If you are creating a new living area on the side or back of the house, a bay window may be something you wish to incorporate into the design as it will echo the Victorian style and create a light and bright area in your room, great for reading and enjoying the weather from indoors. Obviously the bay window design needs to be included in any architectural scheme early on as it impacts the shape of the extension and therefore needs to be incorporated at foundations stage in your build. When drawing up plans for your extension, ask your architect to create a Victorian bay window design that replicates the style of your existing bay. You may not have an existing bay but wish to include a bay window in your extension. If so, look for houses of a similar age and style to yours whose bay windows you like. Supply details of these to your architect and ask him or her to use these designs as a basis on which to design your bay. Note that a bay on the front of the house will just consist of window panels but if on the back or side of the house, it could include a door within the central panel.
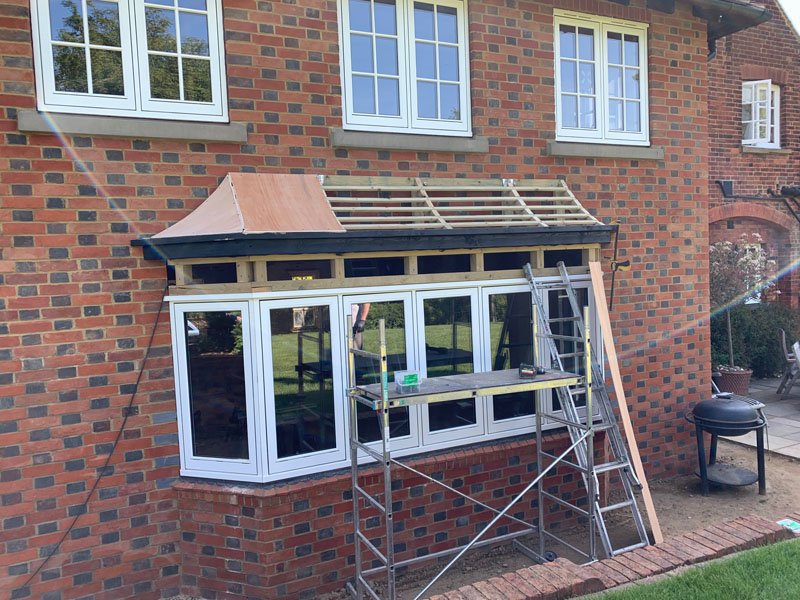
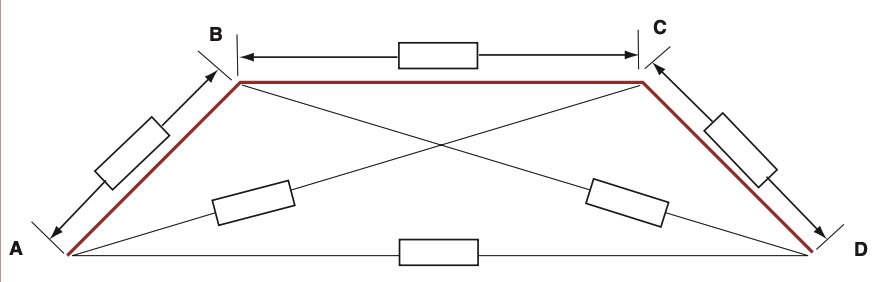
Once your plans are approved, your foundations are laid and you are ready to start the bricklaying stage of the job, it’s important to have detailed dimensions for the bay window. It’s really important that the bricklaying here is accurate so that your bays end up with perfectly symmetrical 45 degree splays. This will ensure that the whole bay can be supplied as one unit by a window company rather than separate parts. At this stage you may also be ordering your supporting steel beams, one of which will sit above the bay window as this is too wide for a window lintel to be used. You need to ensure that bricks are only laid up to the level where the window cill will commence and that on top of your vertical courses of bricks, you lay a course of bricks to act as a window cill and platform on which the window will sit. You could always use other materials than bricks for this. Once these bricks have been laid and you have a detailed plan and dimensions for your bay window, you will be able to order your windows with their frames. Most bay windows have a side window splay at 45 degrees to the main walls of the house, joining up with 3 or 5 central panes. However if your bricklaying is not entirely accurate, you may find that the splay is 46, 47 or 43 degrees and some window companies may struggle to accommodate this, or window fabrication may cost you more.
A local window company may come and measure up for you or you may wish to obtain a number of quotes from window companies all over the country in order to save money. To do this you will need to provide drawings and accurate dimensions for the windows plus frames and the angles of the splay. The company will then send you back their own CAD drawing with all dimensions, angles and specifications and ask you to sign and return it. Make sure you check this really carefully as this is your legal contract with the window company. Ask them to explain any details you do not understand.

Even if you purchase softwood windows, it’s worth the extra money to purchase hardwood frames as windows can fairly easily be replaced if they rot, but frames are a different matter. When we obtained our window quotes for our bay windows plus some casement windows and patio doors, they ranged from less than £10,000 to over £24,000 so it’s well worth getting at least 5 if not 10 quotes. Don’t necessarily choose the cheapest. Make sure you are comparing like with like when choosing which company to use e.g. the type of wood the windows and frames are made out of, the production lead time, delivery costs, where the windows are made and the length and nature of the warranty.
Lead time is likely to be in the 4-8 week timeframe, giving you time to complete your brickwork and roof before the windows are delivered. You cannot fit the windows without these other trades having completed their work and any scaffolding will also usually need to be removed to provide access to fit the windows.
How to build a Victorian Bay Window
A Victorian bay window construction will be one of the trickier jobs that a builder might come across as it needs to be full of period details in order to look authentic and attractive. Here is our step by step guide about how to build a bay window.
Step 1
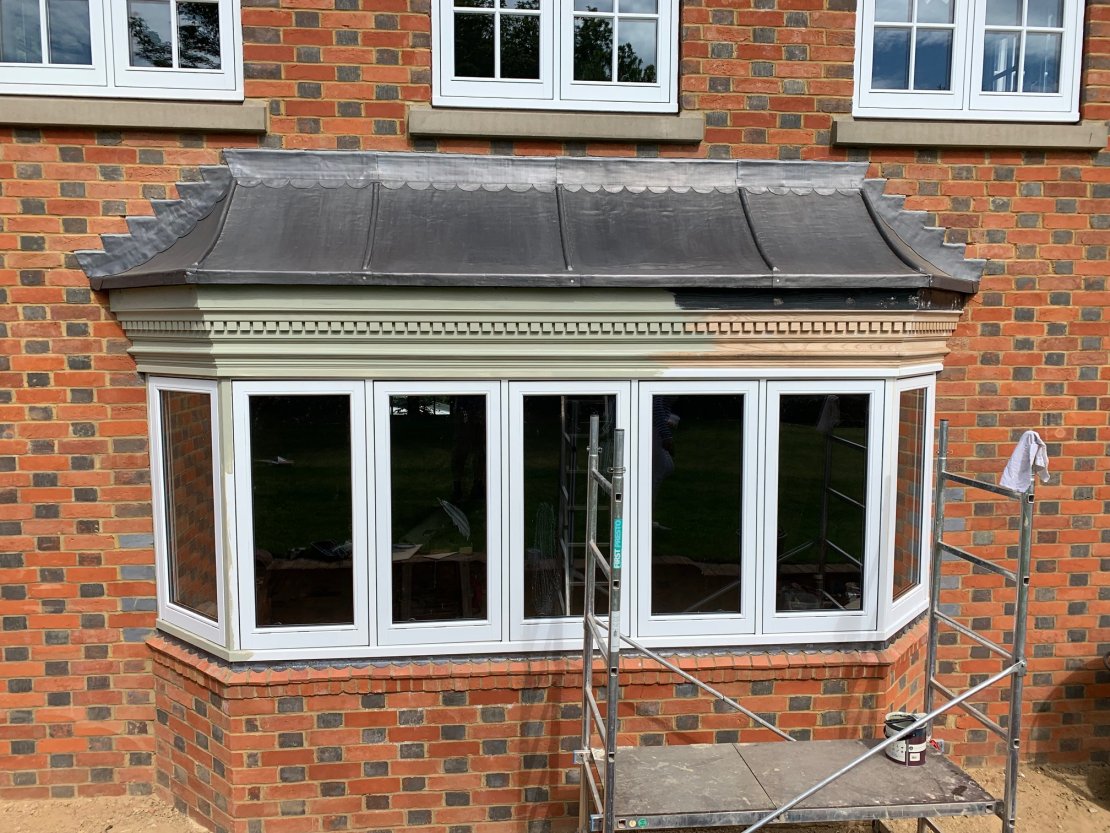
Once the windows are delivered, usually the sides as a separate panel within their individual frame, and the central windows in one unit within the frame, it’s best to remove the windows from their frames by unscrewing them. This makes them easier to lift up and down to fit them to the brickwork. Lift each frame into its place to check it will fit and what trimming they may need. It’s unlikely they will be a perfect fit and some adjustments will probably be necessary. Once they are all trimmed and fit together on top of your brickwork, you may want to install and trim some decorative lead work on top of your brick cills before putting the frames in place. You could also use decorative copper work – please note this will turn green when it ages but this is very Victorian in style. You will fix the frames to the brickwork, side panels first by screwing and fixing them into the brickwork. To put the central panel in you will need some help lifting it as it will be heavy and this is fixed in place using wood glue, screws or other suitable fixings. Make sure the 3 parts fit together perfectly and look symmetrical from the outside before using any glue as unlike the screws, the pieces once glued, cannot be moved or separated from each other easily. Once any trimming is done and the fit is perfect, move one side away so that you can glue down each joining side. Then move back into place and press together, before repeating with the other side panel and other side of the central panel. Make sure everything is pressed together in place and held there. Quickly make any final adjustments if you need to as the glue goes off quickly. Once it’s in place also use some screws to secure it all together.
Step 2
Once the frames are in place, put the windows back into the frames, reversing the process you used to remove them from the frames. Now you need to create a structure above the windows on which to build the decorative lead roof. Some people prefer to create the structure first and fit the windows after. This is up to you.
If creating the structure after installing the windows, run some vertical wooden struts down the wall behind the window and horizontal struts top and bottom of these to act as a frame and anchor points for your roof structure. If you are going with a similar design to us you’ll need some short vertical supports running from the bottom part of the frame up to a higher part. Between the top front of the window and the wall you need to create a frame for the lead roof to sit on. This is done by shaping pieces of wood into a concave curve and fixing them to the vertical and horizontal frame.
Once these are in place you can add batons to act as a framework for the roof shape and then clad these with ply board. You are creating a convex curve. Each piece of ply needs to be cut out so that it sits on the wooden frame and sits flush against the brick wall with no gaps. Ply is only bendable in one direction and it needs to be the thinnest available to be bendable around the frame. The ply is nailed in place. You may wish to add breathable roofing felt over the ply before you apply the lead. Where the joins between the piece of lead will occur, a broom handle would be used on a flat plane however with a convex curve you need something more flexible like for example plastic hosing to create the decorative join. This would be screwed onto the structure before the lead is shaped around it.
Step 3
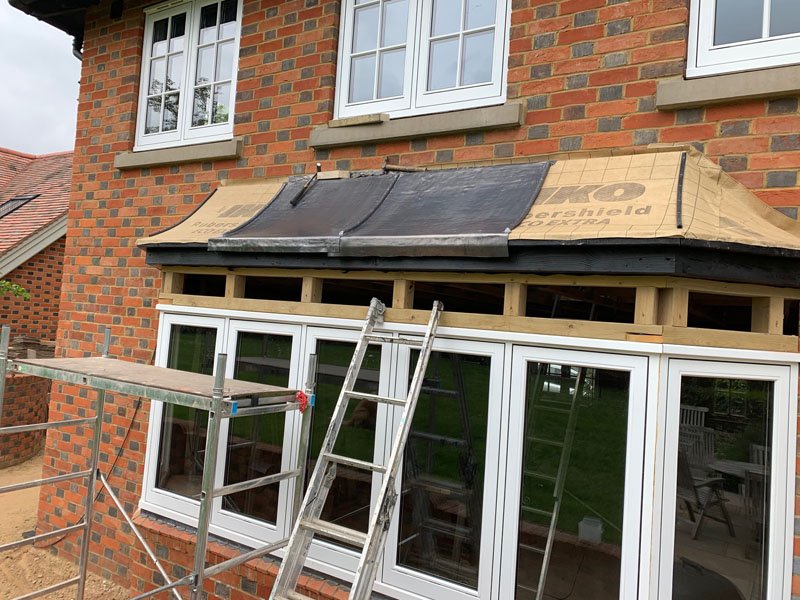
Buy your lead - draw a plan of your roof shape, include the overlaps into your calculations and calculate how much lead you will need - it's expensive so you don't want to over or under buy. Code 5 or 6 lead is recommended and you need to fit it in no more than 1.5 metre sections as otherwise it will crack as it weathers. You need an overhang as specified by the Leadworkers Register recommendations. Trim the lead to the size you require and shape the lead around the shape of the roof structure. It gives a really lovely professional looking finish to the lead work if you add some decorative details such as our semicircles once the roof is covered in the lead, joines are created and all is trimmed neatly. Once measurements are taken, draw a template for the decorative pieces out onto the lead before cutting it with pin snips. You will also need to add some side zigzag pieces to the lead following the mortar lines on your brickwork. Once all the leadwork is in place you should rub it down with patination oil which stops the white salts occurring on the lead and gives a nice patinated finish. Any left over lead can be sold back to scrap metal merchants and it's surprising how much a collection of small left over pieces can be worth.
Step 4
Around the bottom of the roof and on top of the window, decorative mouldings were applied. We chose to use a dentil coving, a skirting used upside down and a symmetrical beading to cover the join between these items.
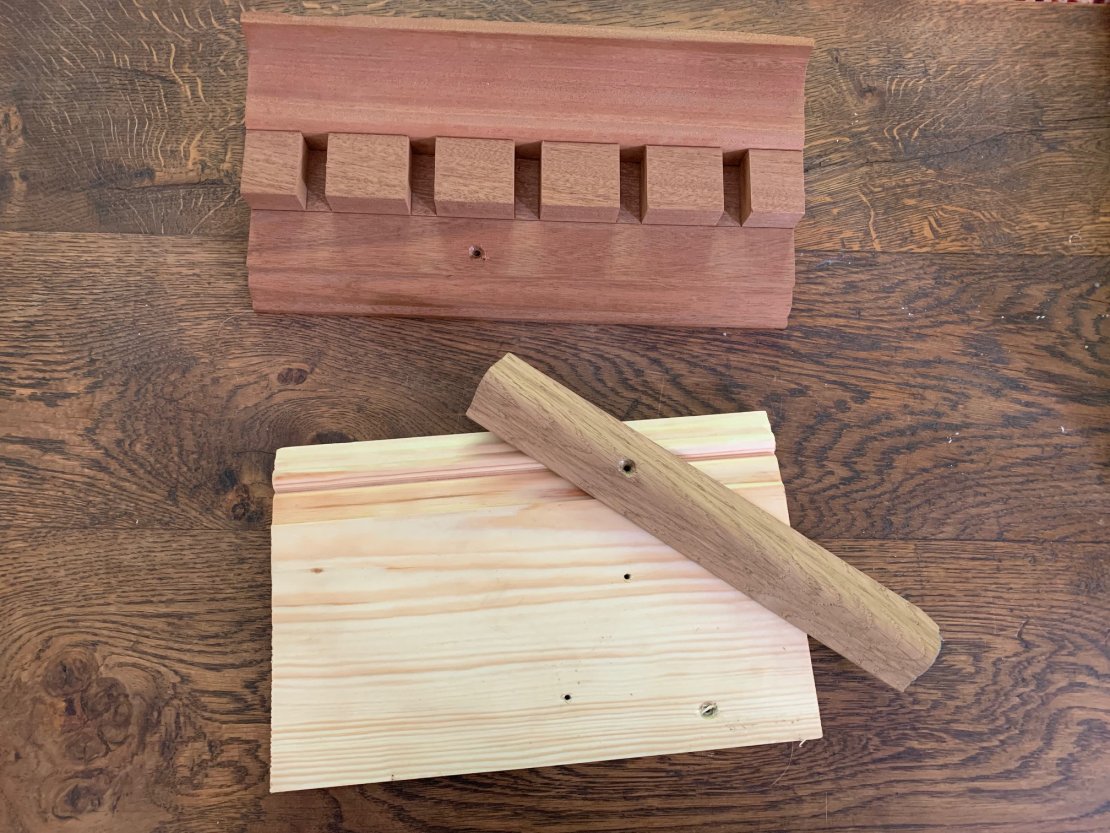
We tried out some samples of these on the window before we put in our order for these items. These were chosen in ash in order to be more weather resistant and long lasting than a softwood. We made sure we obtained lengths that would ensure no joins on the front panel. We also cut the dentil coving so that the dentil teeth were symmetrical ie both sides finished on 1/2 of a dentil tooth. The moudlings were cut to size with mitred corners and then screwed and glued onto the open front of the bay window between the roof and the windows themselves.
Once these were filled and the joins sanded, two coats of Farrow and Ball French Grey eggshell paint were applied to tie the roof in with the rest of the woodwork on the house.
How do you dress a Victorian bay window?
A bay window cannot use a regular straight curtain pole because of it’s curved shape so if you are dressing your Victorian bay window in traditional style with curtains, you’ll need to order a bespoke bent brass or wood bay window curtain pole. The pole is bent at the same angles as the bay window so that it perfectly mirrors the bay window profile. Pass over brackets are used so that the curtains can run freely from each side into the centre of the window. This will enable you to use traditional style curtains and curtain rings and ensure the curtains fit snugly to the windows, minimising dead space and draughts. Curtain poles for bay windows should be measured up using our measuring guide below. They are more expensive than straight poles because of the extra work involved in the bends but these should be regarded as an investment piece.
Be the first to add a comment...