


Some people might look to purchase reclaimed Victorian path tiles, however these are few and far between requiring trips to reclamation yards, are often stained or chipped and the good quality unglazed porcelain Victorian style path tiles we sell are a great match and less expensive than the originals, with unlimited supply, a wide range of colours and sizes. It would be very difficult to tell the difference between reproduction Victorian path tiles and the originals.
Here is our guide of how to achieve that sought after and elegant Victorian garden path using Victorian style path tiles.
Getting the basics right:
The base for a good Victorian garden path
In most cases the path should be able to use an existing concrete base but just in case the area between the road and your door is literally at ground zero or your concrete base is in such poor condition that it needs to be removed, here is our guide to how to create a suitable base for your path.
A path is only as good as it’s substrate – it’s essential that your tiles are laid on a firm flat surface. Clear the area and dig out as far as necessary to allow for the path foundations to be laid bringing the ground to the correct level for the path.
Mark out the dimensions and boundaries of your path. It’s much easier to create and kinder on the eye if this is a regular rectangle with right angled corners, the same as the path tiles you will be using. Take the time to measure up properly and mark out your path. This will save fiddling around with odd dimensions later and avoid a lack of symmetry in your tile laying. If you can decide at this point the style and size of your tiles, you can plan out your design and create a path base that works with your chosen tile dimensions in terms of a layout using whole tiles rather than having to make repeated cuts to whole tiles.
On your firm base (soil, clay, hard core), lay Type-1 MOT (an aggregate with excellent load bearing qualities) to at least 100mm deep. This should then be compacted using a whacker plate that can be hired from a tool hire shop to give you a stable and firm base.
The next layer should be cement – at least 75mm deep to provide a flat smooth level surface gently sloping away from the house to make sure water does not pool up around the house and help the run off of surface water. Use wooden planks fixed in situ to create the boundaries of your path and shutter off the area to cast your slab – this will ensure you have neat straight edges. Shuttering is the creation of a sort of container for your cement to keep the mix contained. Use ballast in your mix of cement, not sand. Once the cement has been mixed and deposited within the shuttered area, tamper and smooth it to create a smooth level finish and then allow the screed to dry out. The screed should be strong enough to walk on around 3 days after application. Before tiling can be started the concrete should be at least 7 days old (the longer left, the better). All substrates to be tiled must be clean and surface dry before laying your Victorian path tiles. Generally cement should be allowed 1 day per mm to dry out; you can add chemicals to speed up the drying process but only remove the shuttering once the cement has completely hardened.
If you are building on an existing concrete path make sure it’s in good condition. Repair it if there are pieces breaking off and crumbling. It needs to be strong and stable. If it’s in very poor condition, dig it up and remove it and then start again as above.
Once you have your clean, dry and stable cement base you can start to lay your path.
How to Choose tiles for a Victorian front path, ordering tiles and planning the job
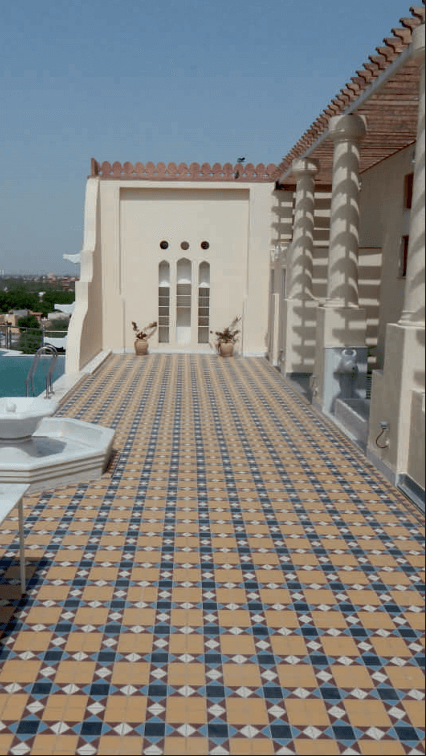
Whilst your cement is drying you can start to consider what tiles may suit your Victorian garden path if you haven’t chosen them already. The most popular and classic choices are a 10x10 black and white, black and red or red and white chequerboard pattern laid in squares or turned 45° and laid as diamonds with a border around the perimeter. Red and black Victorian path tiles are a popular choice and very authentic as they are dark colours less susceptible to staining. Some people opt for a plain black strip border, but another very popular choice is the Classic border consisting of black squares, white or red triangles and black tramlines. This classic border design is available in a choice of variants with different sized squares, triangles and tramlines to suit the inside squares. Lots of other border designs are also available to suit the inside pattern of your Victorian mosaic path tiles.
.If you have a smaller path you may opt for a design consisting of smaller elements, perhaps 5x5 or 7x7 squares. And larger areas may lend themselves to 15x15 square tiles and a bigger bolder border.
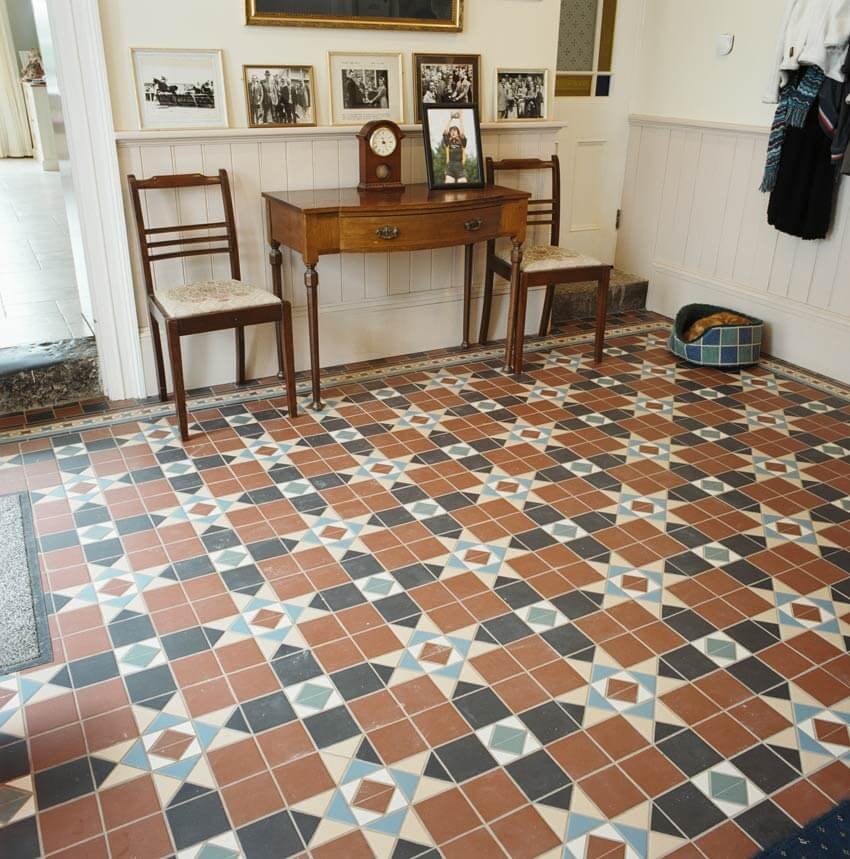
Less common but definitely more impressive are the multi coloured mosaic patterns featured more often in hallways but sometimes outdoors in the grander houses in more well to do areas. These can actually be easier to lay as they can be purchased pre assembled on mesh in sections of 30cm square meaning that for a square metre there are only 9 meshed sections to lay out, as opposed to 100 tiles for the 10x10 black and white square tiles. These meshed or sheeted Victorian tiles can be purchased in pre set patterns in the given colours, or if you are creative and confident, you can create your own pattern or colourway and order using your own bespoke and unique design. For inspiration on Victorian path tile ideas browse the internet using search terms such as London Mosaic path tiles, or Birmingham Victorian path tiles to see designs used in your area, and look at people’s paths when you are out and about in cities and towns. Often designs and colour schemes are local to a town, area or even a street but many of the originals have been removed or damaged which is why research on the internet may be necessary if you want to be really faithful with what was on your path originally in your specific town.
Once you’ve chosen your tiles you need to calculate how many you need. You will need to work out your square meterage and also your linear meterage for the perimeter of the design if you are ordering a border. Don’t forget to deduct the square meterage of your border from the total square meterage to work out the number of square meters of internal pattern that you require. Always order at least 10% extra to allow for slight miscalculations, mistakes and tile cutting.
For the meshed or sheeted Victorian path tiles, you’ll need to plan out the whole job to work out whether the meshed sheets will work within your dimensions. Create a scale drawing of your path and draw in the border first, followed by the internal meshed sheets. If the dimensions do not allow for entire meshed sheets you need to work out how you would cut these down to fit. Potentially a simpler border supplied as individual tiles with the internal pattern on meshed sheets, or a simpler internal pattern with the mosaic meshed border can allow for lots of different dimensions and provide increased flexibility.
Once your tiles arrive, check them against your order both in terms of design and quantity, make sure none of them are broken and that the colours match each other from box to box. Tiles on mesh are usually assembled to order so allow 2-6 weeks for these to arrive, depending on the manufacturer.
How much do Victorian path tiles cost?
These tiles are not that expensive, starting from under £60 per square metre for Red and black or black and white 10x10 Victorian path tiles and £10 per linear metre for simple black strip borders. As most Victorian garden paths are approximately 1m x 2m, the whole path including grout and adhesive may well cost you around £200 (these are 2020 prices). The more you go for a more complicated or colourful geometric pattern, with tiles on sheets and Victorian mosaic tile borders, this could rise to double or triple that figure.
How to lay Victorian path tiles
Gather together the tools and equipment you will need to lay your tiles. This includes tile adhesive, grout, a tile cutter, a trowel, plastic tile spacers, a bucket for mixing your adhesive and grout, a wet cloth or sponge and a water supply.
Plan out your tiles before laying them on adhesive – accurately plan your design first so that you know the size of the centre and border. Find the centre and start from this centre point. Once happy with the layout, remove the tiles and rebox. Mix up a small amount of your adhesive – check the adhesive is suitable for exterior use and is frost resistant. Don’t mix too much as this will pressurise you into rushing the job. Once your centre mosaics have been laid, a border can enclose these tiles, then you can work from your border to the edges. The key to this is planning.
Laying Notes
Once the adhesive has been spread into a layer around 5mm thick, start laying your tiles. If the tiles are not on a mesh, use spacers to separate the tiles. 4mm spacers would be a good choice for outdoor path tiles but this is up to you. Some people prefer no space or little space between the tiles. Continue laying the tiles around the border of your garden path. Make sure they are evenly spaced and level. If they are too low you need to add more adhesive. If they are too high you need to press down more and squish the adhesive. You may need to cut tiles to make them fit into your space but if you choose a design which fits your dimensions well, the cutting could be kept to a minimum. Only put adhesive down where you are laying your tiles and scrape up any adhesive which is not underneath the tiles being laid so you have no adhesive remnants which will be tricky to remove later once they dry.
Cover the tiles with a tarpaulin overnight to allow them to dry and protect them from rain,moisture and frost.
How to grout Victorian front path tiles
Allow the path to fully dry. Cover with Tarpaulin again to ensure that any wet weather does not wash away the adhesive.
Once the tiles have fully dried you can grout them. Choose a grout colour to blend in with or complement your tiles. Grouts are available in white, black, grey, terracotta and other colour variants. Make sure your grout is suitable for outdoor use. Remember that white or pale grout will show dirt very quickly. Remove the tile spacers if used. Mix the grout according to manufacturers instructions and deposit small amounts on the tiles and then work into the gaps between the tiles using a rubber grouting tool. Do this until you have filled all of the tile gaps. Wipe the tiles clean as you go to avoid tile staining. Make sure the gaps are fully filled with grout without any gaps or holes in the grout.
Use a tile cleaner such as Deterdek to remove any grout residue from the tiles. Again cover with Tarpaulin to allow it to fully dry out before exposing the Victorian Garden path to the weather.
You may wish to border the path with Victorian rope twist edging which can give a lovely finish to the path for a small additional cost. Victorian rope path edging is available from garden centres.
Maintenance - how to clean Victorian path tiles
The best way to make sure that your Victorian garden path tiles remain looking great is to use a grout residue remover once you have finished grouting your tiles. Deterdek removes any tiny amounts of grout, even those that you cannot see. Once your tiles have weathered in and become grubby, you can clean these simply using a solution of hot water, washing up liquid and bleach poured over the Victorian front garden path tiles and then mopped. You may need to use a scrubbing brush to remove stubborn stains.
Alternative Victorian front paths
If a more rustic Victorian Pathway design is required, you may prefer to use Victorian pavers, a type of brick that can be used to create an attractive brick path. This is more commonly seen in rural or countryside areas rather than town or city Victorian terraces. Victorian brick paths can look really attractive especially when the bricks are laid in a Herringbone design with red, orange or yellow hued Victorian brick pavers available.
Porches and Hallways
All of the above advice, guidance and methods can be applied equally to Victorian floors inside the house to create beautiful porch floors and Victorian entrance and hallway floor designs. These were often more colourful and intricate mosaic tile designs than used in the paths so this is an area where your creativity can really run wild.
Be the first to add a comment...