


Here is a short guide about how to create a gilded curtain pelmet. This can be done in shades of gold, bronze or silver according to other décor and tastes. Indeed it could be painted any colour you wish although metallics are the more traditional and sumptuous option.
To create our curtain pelmet as shown, we took a highly decorative cornice design in softwood and cut it to the required size in order for the width to overhang the window on both sizes by around 20cm, and the projection to overhang the projection of the window and allow for the bulk of the curtains. We cut mitred edges (45 degree angles). Please note that if using decorative wooden mouldings, the decorative element needs to be symmetrical where the cut is made. So if it’s a flower design for example, cut exactly in the centre of the flower for your mitred edge. As for the projection of your pelmet, this will depend on your weight and quantity of fabric, size of windows and size of the room. Once you determine the size of your pelmet required, mitre your joints and cut the return off so that you have a basic U shape. Screw the mitred edges together.
How do you decorate your curtain pelmet?
- Fill any cracks and defects.
- Prime the wood and allow to dry.
- Spray gold spray (or silver or bronze) onto the primed surface to create a base coat
- Once this is dry, you will need to apply some complementary shades to dull down the gold/silver/bronze and create a burnished and antiqued effect. These instructions are for an antiqued gold effect.
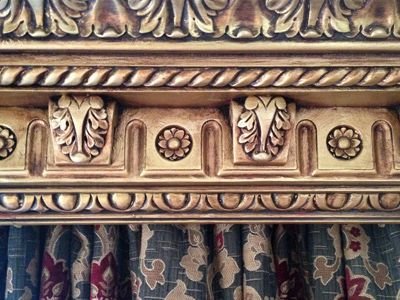
- For a gold pelmet use Burnt Umber acrylic paint liberally stippled into the crevices of the mouldings. With a sponge or cloth remove the excess so that just the Burnt Umber shows in the indentations, with gold the predominant colour in other areas. You may find that the whole effect is too dirty and you may wish to reapply some gold highlights. Do this by applying gold acrylics with a sponge or brush where you wish to highlight. Highlights should generally be applied to the more protruding areas.
- To bring a bit more life to the colour, you may wish to apply a few dots tiny of Cadmium Red hue which will allow the eye to move around the finished effect. These dots should be subtle and not obvious.
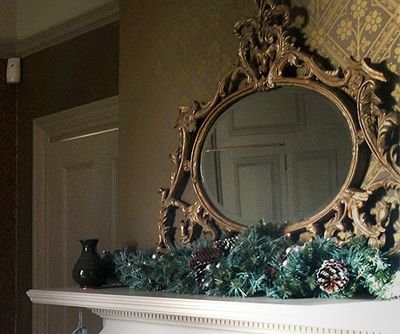
- For a duller, less orange hued alternative, use greys instead of the Burnt Umber. The mirror in the image shows an example of a darker hued alternative to the Burnt Umber. Don’t be afraid to experiment as you can always respray the whole pelmet gold and start again if you are unhappy with the finished effect.
- Allow everything to dry indoors for at least a day before fixing your pelmets in place.
- You need a sturdy ladder or platform and a helping hand from somebody strong when ready to fix your pelmets in place.
- Make sure your curtain track is fixed in place with all curtain hanging accessories before you fix your pelmet in place.
- To fix the pelmet in place you will need a drill, raw plugs, screws and a spirit level to ensure the pelmet is level. You will also need to have very well secured fixings on the back of your pelmet to pass the screws through to then go into the wall.
- Drill holes in your wall in the appropriate location, fix in raw plugs. Put long screws through the pelmet fixings and screw into your raw plugs in the wall. Repeat on the other size. Somebody may need to hold the pelmet in place whilst you fix the pelmet to the wall depending on the size and weight of the pelmet.
- Be careful when fixing your pelmets in place not to knock or chip any of the painted finish off. If you do this, touch the pelmet up in situ rather than taking it down.
- Once fixed in place hang your curtains.

The great thing about curtain pelmets is that they are high up away from the eye so you can get away with less skilled workmanship than otherwise you might do.
The Victorian Emporium sells a great range of beautiful Victorian curtain accessories and materials and decorative cornice designs that can be used to create bespoke pelmets. You can read our ultimate guide to period property renovation here.
Posted by John Plush - Sep 20, 2016 - 10:36
I think that there are one or two details missing from your instructions on how to create the pelmet shown: I’m not entirely certain that “(taking) a highly decorative cornice design” is quite the same process as creating a highly decorative cornice, not to mention your wonderful pelmet. I believe there’s probably more to it than that. From where did you take it? The deepest single moulding I can find on your website is only 70mm. You illustrate something that looks like at least 200mm, and the nature of its detail would suggest something considerably deeper than that. The one shown looks like it’s been built up from multiple mouldings, a complex and very skilled task. And then, how on earth do you ‘mitre your joints’? I don’t possess a mitre-box, or any tool, which approaches the scale required for cutting an accurate mitre in a cornice the shape and size shown. I would say that executing the mitres is the single most challenging part of the whole construction, worth more than your cursory three-word phrase. But thank you for your attention to detail in your advice to find an appropriate location for the fixing holes. Though what exactly are these “fixings on the back of the pelmet”? Also, what are “raw plugs” (referred to twice)? Or perhaps you mean “Rawlplugs”, which have been well-known to practising craftsmen since about the time Queen Victoria died.
Posted by Emma Page - Sep 22, 2016 - 13:12
Hi John thanks for your comments. Unfortunately our supplier of these large ornate mouldings is no longer in business and we have been unable to find anything so ornate or large to sell on our site as you correctly point out. For mitring the joints, I think we had to saw by hand with this particular moulding. The fixings were small metal plates with holes to allow the screws through. Well spotted with the typo of Raw instead of Rawl. “Must do better…”