


I love restoring antiques, using some of the fantastic modern fabrics now on the market. Mixing old and new. Creating an original, one-off piece of furniture. This article will give you an idea of the process of re-upholstery; it’s not a step-by-step instruction manual. Traditional upholstery is a craft that takes years to master. Originally, it was a 5 year full time apprentiship. Now there are many short and long courses. But it still takes years of study and years of work experience before you are a confident, established upholsterer.
How do you restore a Chaise Longue?
To restore a Chaise Longue from the frame up, I’ve used one of my projects as an example. My first job was to strip the frame. Use a ripping chisel and mallet; I took the tacks out, working with the wood grain. A lot of antique frames can be weak, full of tack holes or even woodworm, so the frame needs to be strengthened first. Use wood glue and clamps to fix any joints. Fill old tack holes with wood glue mixed with fine sawdust. Rub onto the frame, leave to dry then gently sand frame down. Avoid sanding down the show wood, I only cleaned and revived it.
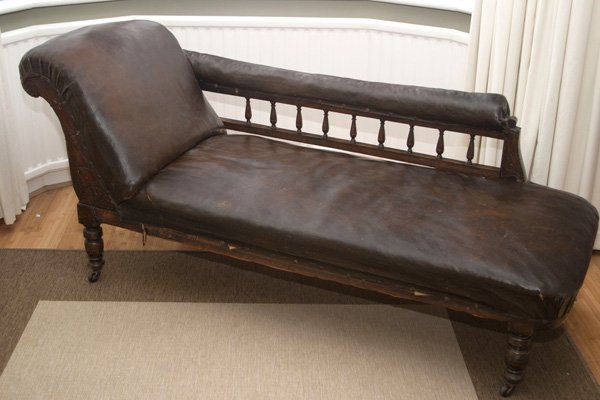
Before restoration
Depending on the style of the Chaise, there will be a natural order of what to do first. With this Chaise Longue, I started with the seat upholstery; the scroll back would be easier to do once the springs on the base had been placed. This way, the inside back fabric would fold neatly over the seat fabric. Fabric folds point down where possible. It’s important to think where the dust will settle!
Restoring a Chaise Longue
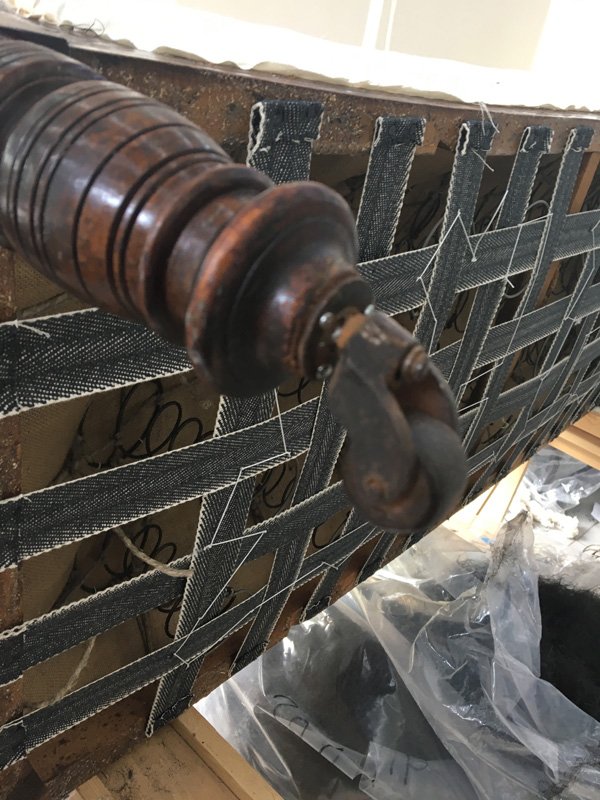
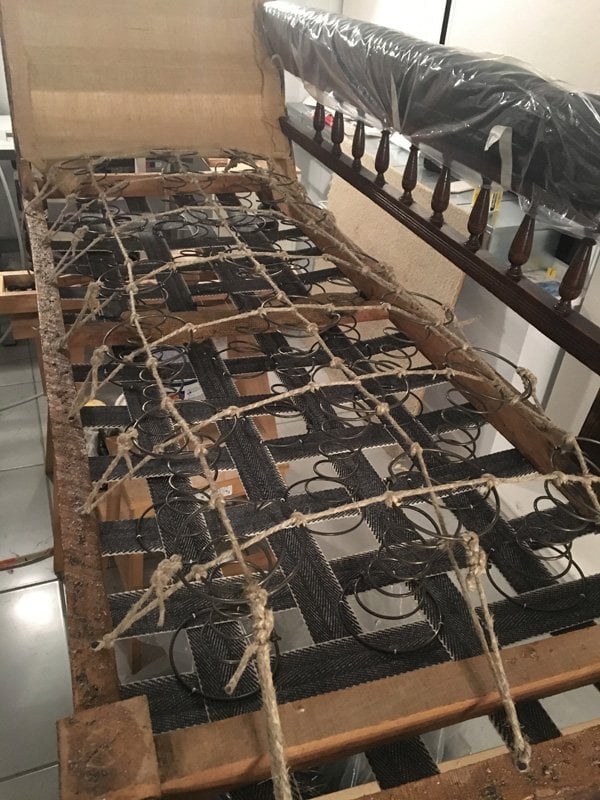
Starting the upholstery, I used large tacks and a tacking hammer to secure the webbing on the underside of the frame. Criss-crossing the webbing, creating a strong base for the springs. After establishing how many springs were needed and the size, I placed them over the webbing to check the positioning. With chalk, I drew around the base of the spring to show a map of where the springs should sit, (in case they fall over in the sewing process). I used a curved or spring needle to attach the springs to the webbing, with a natural or nylon cord. Each spring had four knots and moved from one spring to the next.
The next stage was to lash the springs with laid cord. This process ensures the springs work correctly and don’t buckle or break. Lashing back to front and left to right. The springs are kept under a certain amount of tension to stabilise the seat. Scrim is attached over the springs. Then I sewed the top of the springs to the scrim using natural cord once again.
To start the fibre process, I created bridal ties on the scrim. These ties secured the stuffing whilst I manipulated the fibre. The fibre will form the support and shape and comfort of the whole Chaise. Placing the fibre in the loops, I covered the seat, making sure there is an even amount along the whole seat. Spending a lot of time teasing the fibre with my fingers, joining the handfuls of fibre together. This is an important part of the process. The fibre should be even, smooth and mixed together at the end of it. To check that there is enough fibre, I placed my spread hands over the fibre and pressed down. I could just about feel the springs, which showed it was the correct amount.
The fibre was then covered with scrim and placed correctly over the frame. Ensuring the waft and weft is parallel with the frame. I temporarily tacked the scrim, to start the process of a stitched edge. Stuffing ties held the fibre in place whilst I worked on the stitched edge. The edge needed a lot more fibre, so with the stuffing ties in place, I took the temporary tacks out and added more stuffing, rolling over the scrim and permanently tacking down the scrim with fine tacks on the edge of the frame. Using a regulator, the fibre was teased outwards towards the edges, creating the desired shape. It’s important to follow the thread of the scrim when stitching. I chalked out stitch lines, starting from just above the tacks. If however there are curves in the frame, the thread lines will be distorted. Firstly, I created a line of blind stitching, using a bayonet double-pointed needle. After each stitch line, I regulated again. Top stitching at least two lines. The edges should feel harder than the inside of the seat.
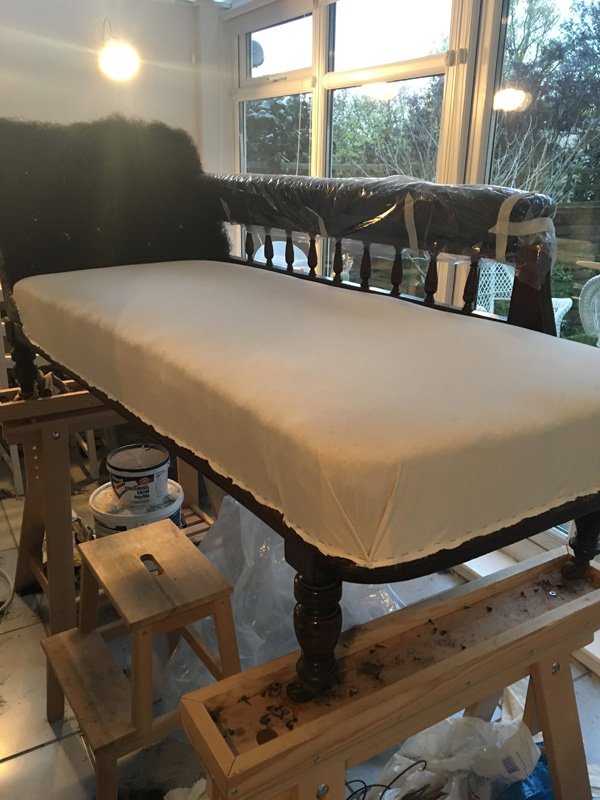
Once the stitched edge was done, a second layer of bridal ties held a thin layer of mixed animal hair. This smoothed out any uneven areas the stitching or ties had caused. Skin wadding was placed over the hair, to ensure the hair did not poke through the fabric. My final step was to cover with calico, attached with tacks. The fabric was next.
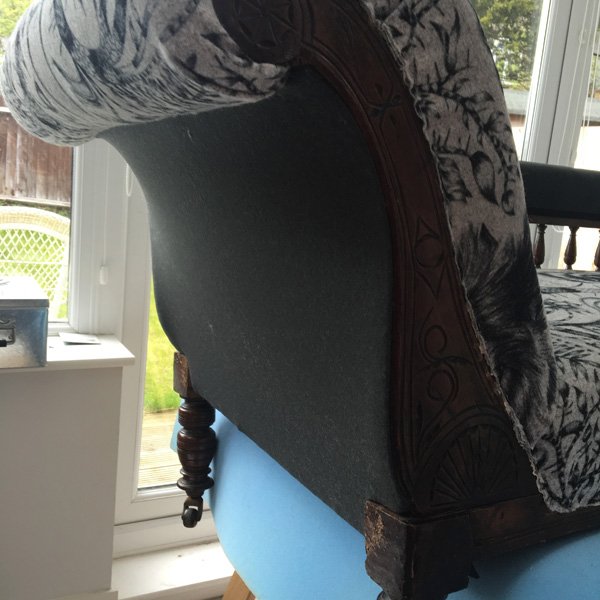
Repeat the fibre/stitched edge process for the arm and scroll back. There were no springs on the arm or back. The arm needed less lines of stitching due to the shape and the back needed an even scroll with a stitched edge.
I covered the arm with a plain grey fabric, and then used a dramatic print for the seat and back. It’s important that the fabric is tight. Not so tight it distorts the chair shape but just enough. Test this by pushing your hands from the outside edges to the middle. If there is excess fabric in-between your closed hand, it’s not tight enough. Folds on the corners are also important. Double pleats worked well on this seat. Pleats should be the same on each corner.
To place the fabric, width and length measurements need to be taken. I made sure there was enough fabric to go under the frame and through to the back frame, where it will be attached. I centralised the pattern and took care it was straight along the seat.
The inside back fabric was more complicated with the scroll. I fixed the position of the fabric and started to fold the scroll until they were even and balanced. The pleats should work with the natural shape of the scroll and the folds should point to a central focal point.
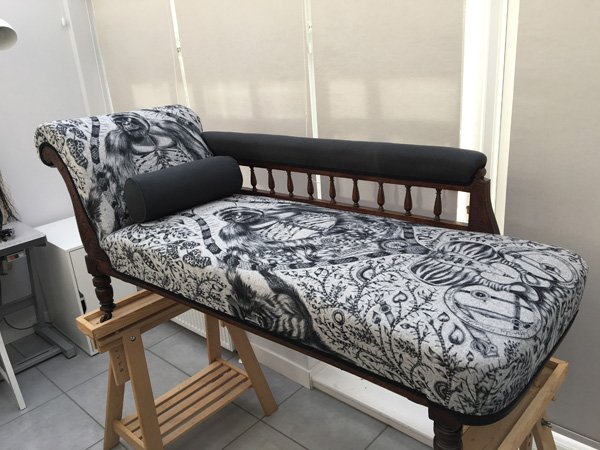
There was a lot of show wood on this Chaise, so the fabric had to be fixed to the indented area just before the show wood.
I decided to use the plain grey for the outside back as well. Hand sewing onto the back frame with a slipstitch using a curved needle and slipping thread.
The Chaise had a black braid placed around the show wood. This was fixed with a glue gun. Braid or gimp not only covers up the tacks but also puts a frame around the fabric.
The last part of the process is to fix a black bottom cloth on the underside of the base, to cover the webbing. The Chaise is now beautifully restored.

This article has been written for us by an old friend of The Victorian Emporium, Claire Platten, who is a fabulous upholsterer based in East London.
Claire Platten studied Fine Art at University, had a successful career in marketing and graphic design before re-training as an upholsterer. Whilst working on furniture commissions, Claire also works on her own collections. Working with modern and traditional techniques, Claire puts her experience with design, colour and craft to produce unique pieces of furniture.
Be the first to add a comment...